Upgrading your graphics card is the single most effective way to boost your PC’s gaming performance. Whether you are looking for smoother frame rates or higher resolutions a new GPU can transform your experience. However opening up your computer case can feel intimidating if you have never done it before.
This beginner friendly guide will walk you through how to install a graphics card in your PC safely. We will cover everything from checking compatibility to installing the final drivers. By following these steps you can save money on professional installation and gain a better understanding of your machine.
Pre Installation Is Your PC Ready?
Before you touch a single screw you must ensure your new hardware is compatible with your current setup. Not every graphics card fits in every computer.
Checking Power Supply PSU Compatibility
Graphics cards are the most power hungry components in a PC. Look at your power supply’s label to check its wattage. Most modern mid range cards require at least a 600W to 750W PSU. If your power supply is underpowered your PC may crash under load or fail to boot entirely.
Measuring Case Clearance and GPU Dimensions
Modern GPUs especially triple fan models are incredibly long and thick. Measure the internal space of your case from the back I/O shield to the front fans. Compare this to the length of your new card to ensure it won’t hit the hard drive cages or front radiator.
Gathering Necessary Tools
You don’t need a professional toolkit for this job. A standard Phillips head #2 screwdriver is usually the only tool required. We also recommend using an anti static wrist strap or working on a non carpeted floor to prevent static discharge from damaging sensitive electronics.
Preparing Your Software
Software preparation is often overlooked but it is vital for a smooth transition. Conflicting drivers can cause Blue Screen of Death errors or poor performance.
Uninstalling Old Drivers Using DDU
If you are switching from an AMD card to an Nvidia card (or vice versa) use a tool called Display Driver Uninstaller (DDU). This utility which you can download fromGuru3D wipes every trace of the old software from your registry. This ensures that the new driver starts with a clean slate.
Downloading the Newest Drivers in Advance
Internet speeds can be unpredictable. Visit the manufacturer’s website (Nvidia AMD or Intel) and download the latest driver package before you take the PC apart. Save the installer to your desktop for easy access later.
Powering Down and Safety First
Safety is the priority when handling PC components. You want to ensure there is zero electricity flowing through the system.
How to Properly Discharge Static Electricity
Turn off your PC and flip the switch on the back of the power supply to the “Off” position. Unplug the power cable entirely. Press and hold the PC’s power button for 10 seconds to drain any remaining electricity stored in the capacitors.
Disconnecting Cables and Opening the Case
Unplug your monitor keyboard and other peripherals. Lay your PC on its side on a flat stable surface. Remove the side panel usually held by two thumbscrews to reveal the motherboard and the internal components.
Removing the Old Graphics Card
If your PC currently uses integrated graphics you can skip to the next section. Otherwise you need to clear the way for your new hardware.
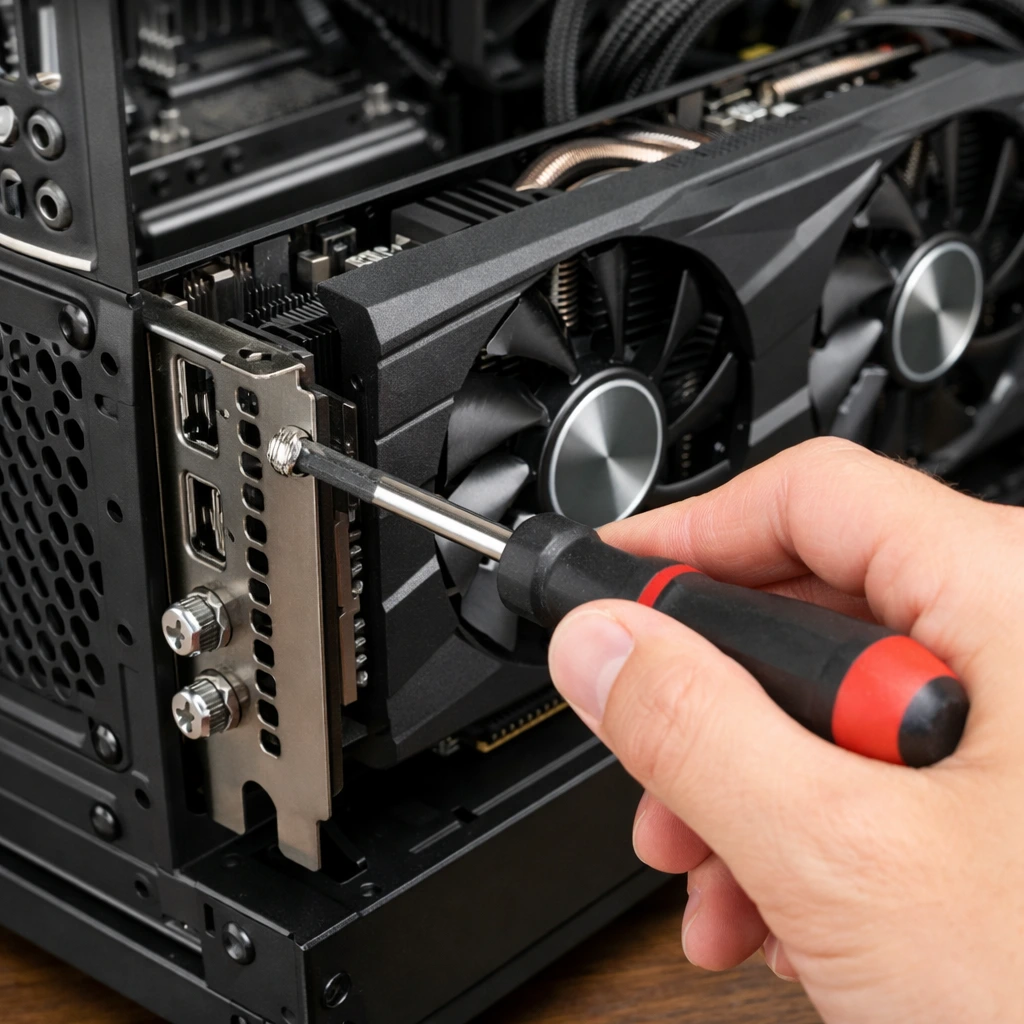
Unscrewing the Bracket and Releasing the PCIe Latch
The graphics card is held in place by one or two screws on the rear expansion bracket. Remove these screws first. Next look at the long plastic slot where the card meets the motherboard. There is a small plastic lever or tab at the end. Press this latch down to unlock the card.
Safely Extracting the Hardware
Grip the card firmly and pull it straight out of the slot. Do not wiggle it side to side as this can damage the PCIe pins. Place the old card in an anti static bag for safekeeping.
Install a Graphics Card
Now comes the most exciting part putting the new hardware in place.
Aligning the GPU with the PCIe x16 Slot
Identify the top most PCIe x16 slot on your motherboard. This slot provides the most bandwidth for your card. Align the gold contact pins on the bottom of the GPU with the slot. Ensure the metal bracket on the card lines up with the openings in the back of the case.

The Click Ensuring a Secure Connection
Apply firm even pressure to the top of the graphics card. You should hear a distinct click as the motherboard latch snaps back into place. This sound confirms the card is fully seated.
Securing the Card to the Chassis
Replace the screws you removed earlier to secure the GPU bracket to the case. This prevents GPU sag which occurs when heavy cards lean down and put stress on the motherboard slot.
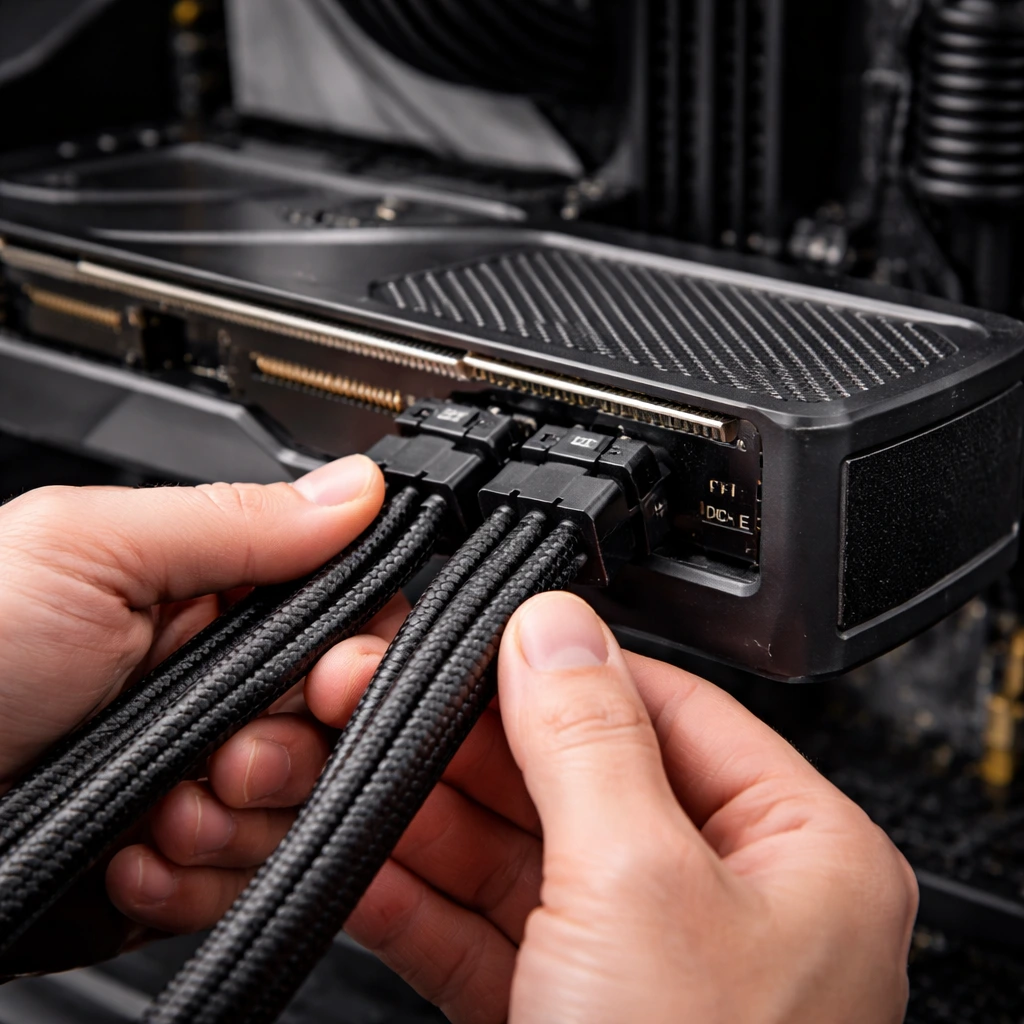
Connecting the Power Cables
Most high performance cards require dedicated power cables from the PSU. They do not get enough electricity from the motherboard slot alone.
Identifying 6 pin and 8 pin Connectors
Look at the side or end of your GPU for power ports. Your PSU will have cables labeled PCI E. These are usually 6+2 pin connectors. Plug them in until they click. If your card has two 8 pin ports ensure both are filled using separate cables if possible for better stability.
Managing Cable Tension and Airflow
Ensure the cables are tucked away and not pressing against the GPU fans. Proper cable management allows for better airflow which keeps your new card cool during intense gaming sessions.
Final Setup and Driver Installation
With the hardware inside it is time to bring the system back to life.
Booting Up for the First Time
Replace the side panel and plug the power cable back in. Important Plug your monitor’s HDMI or DisplayPort cable into the new graphics card not the motherboard. If you plug it into the motherboard you won’t be using your new GPU.
Installing Nvidia GeForce Experience or AMD Adrenalin
Once Windows boots your resolution might look low. This is normal. Run the driver installer you downloaded earlier. If you are unsure of the specific steps for your brand of card you can follow our comprehensive guide onhow to update graphics card drivers. Follow the prompts and your screen may flicker or turn black momentarily. Once finished restart your PC to complete the installation.
Troubleshooting Common Installation Issues
- No Signal on Monitor Check if the GPU is fully seated and the power cables are pushed all the way in.
- PC Beeps or Won’t Turn On This often indicates the PSU isn’t powerful enough or a cable is loose.
- Fans Spinning but No Video Ensure the monitor is plugged into the GPU port not the motherboard I/O.
Conclusion
Learning how to install a graphics card in your PC is a rewarding experience that extends the life of your computer. By taking the time to prepare your drivers and carefully seating the hardware you ensure a reliable and powerful gaming setup. Now that your installation is complete load up your favorite game and enjoy the upgraded visuals.
FAQ Section
Do I need to uninstall old drivers before installing a new GPU?
Yes it is highly recommended. If you are switching between brands (like moving from Nvidia to AMD) old driver files can cause system instability. Using a tool like Display Driver Uninstaller (DDU) ensures a clean slate preventing crashes and performance dips with your new hardware.
How do I know if my power supply (PSU) can handle a new graphics card?
Check the total wattage on your PSU’s label and compare it to the Recommended System Power listed on the GPU manufacturer’s website. Also ensure your PSU has the correct PCIe power connectors (6 pin or 8 pin) required by the new card.
Can I install an Nvidia graphics card on an AMD motherboard?
Absolutely. Graphics cards use a universal PCIe x16 slot found on almost every modern motherboard. Whether your CPU and motherboard are made by AMD or Intel they will work perfectly with any Nvidia AMD or Intel Arc graphics card.
Which PCIe slot should I use for my graphics card?
You should always use the top most PCIe x16 slot on your motherboard. On most boards this slot is wired for the full bandwidth (x16 lanes) and is directly connected to the CPU providing the fastest performance for gaming.
Why is my monitor showing No Signal after installing the new GPU?
The most common mistake is plugging the HDMI or DisplayPort cable into the motherboard’s back panel instead of the graphics card itself. Ensure your cable is connected directly to the new ports on the GPU. Also double check that the card is fully seated in the slot and the power cables are clicked in.
Will a new graphics card work with my old monitor?
As long as your monitor has an HDMI or DisplayPort input it will work. If you have a very old monitor that only uses VGA or DVI you will likely need an active adapter to connect it to a modern graphics card.